Tuesday, May 27, 2014

Mosquito Control is an Oxymoron

Clearly, there is no such thing as Mosquito Control! 

'Tis the season!

Mosquitoes congregate at our front door and latch on to our dog as we let him out and back in, bringing unwanted, blood-sucking guests into the house to later terrorize us.

When I saw this amazing container plant idea for Mosquito Control, I was extremely excited to try it out. I visited multiple greenhouses in the area to be able to collect all the plants needed. After each purchase, the excitement grew. Each greenhouse worker was familiar with each plant, and all mentioned "mosquito plants" as the descriptor. This just added to the excitement! As I collected the plants needed to make this amazing force-field, I envisioned parking the finished container right next to the front door and having a mosquito-free environment. All the mosquitoes would swarm elsewhere because of the aroma this miracle container would emit. How wonderful it would be to not have the wall of mosquitoes lurking.

Well, long story short. Don't bother. I think the plants in this container must actually attract mosquitoes.

May I just say..... EPIC FAIL! Thank you, container artist guy, for sucking me into this idea. One greenhouse stated, "people buy these plants and put them around their deck." "Oh, wow! Awesome!" I thought.

Now, perhaps I am jumping the gun here. I just planted this container, and in all fairness, we did get a bumper crop of mosquitoes this year. Perhaps when this container grows to epic proportions will it finally produce a stench worthy of warding off these annoying insects, but for now, I am not amused.

I feel like this rates right up there with buying cleaning products that claim to remove rust, lime, and scale. Yah, right. That doesn't exist either. I do find the directions to be appropriate, "repeat as needed." Yes, like 1,000 times with 5-grit sandpaper.

Perhaps I just need to add 5-grit sandpaper and some rust/lime/scum remover to this container plant! I should have known... I have NEVER had citronella (anything) ward off any of the mosquitoes that hang around here. What was I thinking?

For those wondering what plants are in this container:

  • Citronella geranium (x1)
  • Marigold "Gem" (x 2)
  • Lemon grass (x 1)
  • Ageratum "Artist Purple" (x 4)
Original plant plan called for (in addition to the above):
  • Catnip (x 2)
  • Lemon thyme (x6)
I find it hard to believe the additional catnip and thyme would make a difference. The marigolds alone would send me packin'. But that's just me.

Tuesday, April 1, 2014

Bloody Mary "Mock-tail"

This little beverage is alcohol-free. Enjoy.

Serves: 1

Ingredients: 

  • 3 oz can Tomato Juice
  • 1/2 oz Lemon Juice
  • Celery Salt (just a sprinkle)
  • Black Pepper (just a sprinkle)
  • Cayenne Pepper (just a sprinkle) 
In a glass, add and mix the above ingredients.
Add ice.
Garnish with shrimp, celery, olives, or whatever you with.

Almond & Coconut Flour Crust

Single BatchIngredientsDouble Batch
1/4 c + 2 TB             Almond Flour3/4 c
1/4 cCoconut Flour1/2 c
1/4 cCoconut Milk                   1/2 c
2 TbsButter (room temp)4 Tbs
1/2 TbsVanilla (optional)1 Tbs
1/2 TbsCoconut Oil1 Tbs
1/4 TbsCinnamon1/2 Tbs


Instructions:

Preheat oven to 350 degrees.
Mix all ingredients in bowl.
Press into any baking pan or also cupcake pan for mini pie crusts.
Bake 15-20 minutes or until edges brown.

Serving Suggestions:


Chocolate Yogurt "Pudding"

  • 1/4 cup Plain Greek yogurt
  • 1 tsp - 1 Tbs Coco powder
  • 5-10 drops Stevia to taste
  • Top with fresh whipped cream and crumble or toasted almonds or cashews

Pumpkin Pie

  • 1/4 cup Canned pumpkin
  • 1/2 tsp Pumpkin Pie Spice
  • 5-10 drops Stevia to taste
  • Top with fresh whipped cream

Blueberry Cream Pie

  • 1/4 cup Plain Greek yogurt
  • 1/4 cup Fresh whipped cream
  • 1/4 cup  Fresh blueberries

Toppings:


"Crumble"

  • 2 Tbs Almond Flour/Meal
  • 2 Tbs Coconut Flour
  • Pinch of salt
Toast in a pan for 1-2 minutes stirring constantly until it starts to slightly brown. Remove from heat, then add:
  • 1 tsp Coconut oil
Mix together into a crumble.

"Whipped Cream"


For a small batch,
  • 1/8 cup whipping cream
Whip/whisk until peaks form, then stir in:
  • 5 drops Stevia
  • 1/2 tsp Vanilla


Tuesday, March 18, 2014

Tenderloin Medallions with Rosemary Sauce

1 pound tenderloin (beef or pork)
1 Tbs butter (to sauté meat)
Sauce:
1 Tbs butter
1/2 tsp cocoa
1/8 tsp salt
1 clove garlic, minced
1/2 tsp rosemary (dry) or 1 tsp fresh
1 tsp coconut amino *
1/4 cup water *

(For unrestricted diet, use 1/4 cup dry red wine or beef broth (if using beef) or 1/4 cup dry white or rose wine (if using pork))

Instructions:
Cut tenderloin into 3/4 inch slices. Heat 2 tablespoon butter in 10" skillet or nonstick pan over medium high heat. Sauté tenderloin 3 minutes each side. Remove meat to platter and keep warm.

Add 1 tablespoon butter to pan, and the remaining ingredients until bubbly. Heat to boiling and stir 1 minute. Serve over meat.

Wednesday, March 12, 2014

HOT not CEREAL


We like to call this "Hot Not" cereal because it isn't exactly your typical Cream of Wheat or Oatmeal that you would expect in the morning. This is a Phase 1 or Phase 2 Antifungal - friendly recipe. Quick to make, delicious to eat. The best part is, there is room for substitutions and modifications for whatever your taste buds are craving.

Healthy Apple, Cinnamon, Quinoa Hot Breakfast Cereal

Makes 2 servings.

Ingredients:

1/2 cup Quinoa (uncooked)
1 cup Water
1 Green Apple (washed, cored, chopped)
1/2 tsp Cinnamon (more or less to taste)
5-10 drops Stevia (more or less to taste)
1/2 cup Plain Greek Yogurt (optional)

Directions:

Place quinoa, water, chopped apple, and cinnamon in sauce pan. Bring to a boil, reduce heat to low and cover for 10-15 minutes (or until the Quinoa has absorbed all the liquid). Remove from heat, stir in Stevia and Yogurt. Serve. Enjoy.

Other options. You could use...

Berries in place of apples.
Pumpkin puree and pumpkin pie spice.
Nutmeg or your other favorite spices.
Cream instead of yogurt.
Honey or Maple Syrup in place of Stevia.

The possibilities are ENDLESS!

Monday, March 3, 2014

Shrimp Salad & Dip

 
This easy-to-make Shrimp Salad can also be used as Dip. If you like "San Francisco's Seafood & Shrimp Salad" from Sam's Club, you will like this. It is very similar (my mom said she actually prefers my version over theirs - listen to your mother!). In this recipe we used 'healthy' ingredients. Many diets, including "Phase 1 and Phase 2 Antifungal" restrict starch, sugar, carbs, flours, and so on. The best part is, the measurements can be adjusted to taste and substitutions can be made as well (noted below).

 
Shrimp Salad: Shown served with lettuce and amaranth crackers

Shrimp Salad / Dip

Ingredients:

  • Approximately 35 small shrimp (cleaned/cooked/shelled/deveined)
  • 1/4 cup Onion (diced)
  • 1 stalk Celery (chopped)
  • 1/2 cup Sour Cream*
  • 1 tsp Lemon Juice
  • 1/8 tsp Paprika
  • 1/8 tsp Garlic Powder
  • 1/8 tsp Onion Powder
  • 5-8 drops Stevia*
(* If you are not on a restricted diet, feel free to replace the Sour Cream with Miracle Whip and use Sugar in place of Stevia. You can also use a mixture of sour cream and plain Greek yogurt as well.)
 

Instructions:

  • Shrimp: Rinse, remove tales and veins (if any) and chop in to small pieces.
  • Celery: Wash and chop.
  • Onion: Peel and dice.
  • Lemon: Wash lemon, cut, and squeeze out juice (or use bottled lemon juice). 
  • Sour Cream: Measure into a medium bowl then add the lemon juice and stir
  • Spices: Measure into sour cream mixture and stir. Add Stevia to taste.
  • Add shrimp, celery, and onion and stir until nicely blended.
  • Chill and serve.
  • Refrigerate leftovers (if there are any). 
It's ok to sample the shrimp!


Serving suggestions:

Put a scoop in a leaf of lettuce for a grain-free salad or wrap (or your favorite bread/tortilla).
Serve with Amaranth crackers (or your favorite crackers).
 
Keeps well in the refrigerator for about 4-5 days. Stir before serving as minor separation can occur.


There ya have it! Simple ingredients to make a delicious Shrimp Salad / Shrimp Dip! 
 

Wednesday, January 1, 2014

Spohie's Pickled Fish

Sophie's Pickled Fish - Seriously... THE BEST!

This recipe is extremely easy and delicious. Just follow the detailed, step-by-step instructions and you will be enjoying mouth-watering pickled fish before you know it!

For this recipe, we use 5 pounds of fish (weight before cleaning).
Yield: 1 1/2 quarts pickled fish
Ready to eat in 3 weeks

Full ingredients list:

  • 4 cups Water
  • 1 cup Pickling salt (not iodized salt)
  • Approx 5 cups White vinegar
  • 2 cups Cider vinegar
  • 2 Tbs Pickling spice
  • 1 tsp Mustard seed
  • 2 cups Sugar (can cut in 1/2 or use even less if you prefer)
  • 4 Bay leaves
  • 2 Dried Chile or Cayenne peppers
  • 5 Whole cloves
  • 1/2 tsp Whole black pepper corns
  • 1 medium White Onion
  • 1 Lemon 

Instructions:

  • Clean & filet fish (we use Northern Pike)
         (No need to worry about the Y-bones. They dissolve.)
  • Cut fish into cracker-sized chunks
         (1 1/2" or so, fish will shrink a little during the pickling process)
  • Freeze fish in water (This step is very IMPORTANT!)
         (For whatever reason, this prevents fish from getting a 'slimy' texture.)

To pickle the fish:

  • Let fish defrost
  • Drain water
  • Mix the following until dissolved in a large non-reactive bowl:
          4   cups   water
          1   cup     pickling salt (not iodized salt)
  • Put fish into salt water (make sure pieces are not stuck together)
  • Cover and refrigerate for 48 hours
After the 48 hours is up:
  • Drain and rinse fish.
  • Put fish back into bowl and pour white vinegar over it to cover.
  • Stir fish around so pieces are not stuck together (do not pack in tight)
  • Add more vinegar if needed to cover fish completely
  • Cover, refrigerate, and let soak for 24 hours (stir a couple times - every 8 hours or so - to make sure all sides of each piece get exposed to the vinegar) 
After 24 hours is up:
  • Mix ingredient for the brine (recipe below), boil brine for 1-2 minutes, remove from heat and allow to cool completely. (Do not pour hot brine over fish. We are pickling it, not 'cooking' it.)

Pickling Brine:

  • 2 cups Cider vinegar
  • 2 Tbs Pickling spice
  • 1 tsp Mustard seed
  • 2 cups Sugar
  • 4 Bay leaves
  • 5 Whole cloves
  • 1/2 tsp Whole black pepper corns
  • 2 Dried Chile or cayenne peppers [This ads flavor, not heat.] 
When brine is cool:
  • Peel lemon (be sure to remove as much of the white part of the rind as possible)
  • Slice lemon and remove seeds
  • Peel and thinly slice onion

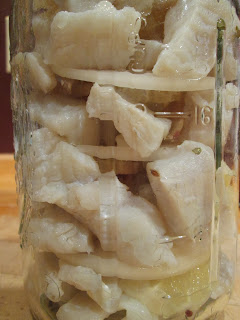
  • Layer into the jar: Onion, fish, lemon (repeat)


  • Remove the Chile pepper and whole Bay Leaves from the brine.
  • Cover layered fish with cooled brine
    (TIP: The spices all float to the top while the brine is cooling. To get all the spices into each jar equally, I pour the brine in a large measuring cup and stir it while I pour.)
  • Remove air bubbles with a non-metallic utensil (a wooden chop stick works great).
  • Wipe the rim of the jars.
  • Place lids on jars, label and mark a date on lid 3 weeks from processing so you know when it is ready to eat.
  • Give the jar a little tumble to distribute the spices if needed.

ENJOY!