Wednesday, December 12, 2012

Brenda's Easy Biscotti


My late friend, Brenda, and I would always include a recipe in cards and notes that we sent to each other. What a fun way to remember our friendship... each time we make her recipes! This is one of my favorites.

Prep & baking time: 1 hour from start-to-finish
Serves: Approximately 16

Main Ingredients:

  • 1 box cake mix (Butter Pecan is the best!)
  • 1 cup flour
  • 2 eggs
  • 1/2 cup butter (softened)
  • 1 cup chopped nuts (optional)

Decoration Ingredients:

  • course sugar (decoration)
  • bag of chocolate/white chips or almond bark (optional decoration)

Instructions:

Part 1 - Dough prep + 1st round of baking

  • Preheat oven to 350
  • Mix Main Ingredients together (set aside Decoration Ingredients for later use)
  • Separate dough into 2 globs and place on a jelly roll pan or large cookie sheet
  • Form each dough glob into a rectangle shape (about 6" x 7") and flatten to approximately 3/4 - 1" thick
  • Sprinkle with course sugar
  • Bake 25-30 minutes 


Biscotti Recipe
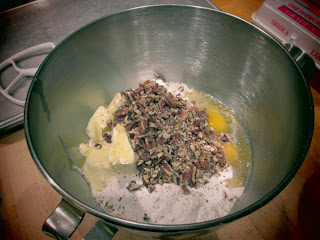
Add all ingredients together.


Mix until ingredients turn into a nice dough.

Form into a blob and cut equally in half.


For large biscotti, form into two rectangles  6" wide by 7" long by 3/4" thick (shown above)
For small biscotti, form into two rectangles 4" wide by 14" long by about 1/4" thick. (shown below)


Don't forget to sprinkle decorative sugar on top before baking.

Part 2 - Cool, cut, rollover, and toast 

  • Remove from oven
  • Let cool to the touch (this is important to firm it up so its easier to cut)
  • Cut into 1" wide slices (a thin serrated fruit knife works best - or other thin serrated blade -  less breakage. It is literally like sawing through dry crust. Be careful at the edges.)
  • Gently tip-over slices on their cut side and arrange in pan so they are not touching (this will help them toast evenly)
  • Bake slices 8-10 minutes

 
Let Biscotti cool to the touch before slicing or it will crumble.
Use a ruler or tape measure to mark off lines at 1 inch on each side. Use a ruler or straight edge for a cutting guide.

 
After you 'saw' through the Biscotti, use a small metal spatula to loosen each piece from the pan.

 
Gently lay them on their side. You will get some breakage near the ends especially if you have included pecans.
And yes, you will have a lot of crumbs, don't worry about them, they won't burn.

Part 3 - Rollover and toast (again)

  • Remove from oven and let cool for 1-2 minutes (This is important! If you flip them right away, they are flimsy hot out of the oven. Letting them cool will firm them up so they flip easier - again, less breakage)
  • Turn each slice over to toast the opposite side
  • Return to oven
  • Bake slices 8-10 minutes

Part 4 - The grand finale

  • Remove from oven
  • Let cool 1-2 minutes
  • Remove from pan to finish cooling
  • Decorate -- or just share and eat!


Decorating tips

  • Melt a bag of chocolate chips / or white chocolate chips / or almond bark / etc according to directions on bag
  • Dip the biscotti 1/2 way (either the cut edge or the long way)
  • Or, put melted chocolate in piping bag (or ziploc w/ corner cut off) and drizzle designs over the top 
  • Set on wax paper to set up

Other tips

  • Any cake batter works well, but we found chocolate to be a little more dry. Use a little less flour to remedy this.


Monday, October 29, 2012

Keep Flies Off Veggies

I despise the flies!


There are many harvest days with a garden... and you can't do all the canning in one day. If veggies are left on the counter, even draped in a towel, the fruit flies WILL find them.... and multiply. Here is a quick solution for keeping your veggies FLY FREE. Tested. Works great!

Veggies in the Closet!

Purchase or find an inexpensive plastic shelf (36"wide). The one we have can be disassembled and stored when not in use... AND has shelves with a lip. (This comes in handy! I'll explain later.)


Purchase or find a portable/temporary Clothes Closet and use the COVER only. This one is 36"w x19.5"d x 63"h.  Find another use for the clothes hanger contraption. (BONUS: It is very handy next to the dryer in the laundry room.)
 
Assemble the shelf. Insert shelf inside the clothes closet cover (remember, we are just using the cover, not the clothes hanger contraption). 
 
Make sure veggies are dirt/bug free (wash veggies & allow to dry if necessary). Place them on the shelves inside the 'closet' and zip it shut. This keeps the flies OUT.
 
 
This closet has a 'window' on the top. VERY handy! You don't have to unzip it to see if the veggies are ripening.
 
 
If you find a shelf with a lip, this is excellent! Why? Because if you have some veggies go bad, sometimes they leak.... the lip will keep any liquid from running off the shelf.


The Pro's

  • Very useful to store veggies that have to ripen more
  • Keeps your kitchen counter a workspace vs veggie storage area
  • Great waiting room for veggies during the canning season when you can't get to all of them on the same day/week
  • Keeps flies off the veggies
  • Closet and shelf can be disassembled after harvest season and stored in a small area

The Con's

  • The closet material doesn't fit the shelf exactly - so I tucked the excess material behind the shelf. It is frumpy. A minor thing. That's it.
 [Extra notes: I was going to enclose the shelf using bulk replacement window screen and use Velcro around the top & bottom of the shelf to attach it  - that option was too expensive. The Velcro alone was over $20. The shelf was older and not in use, and the closet was about $14-$16.]

Friday, October 26, 2012

Grilled Pizza - YUM!

Grilled Chicken Pesto Artichoke and Roasted Red Pepper Pizza 

Ingredients are approximate. Add as much sauce, veggies, and cheese as you like.
Prepare the pizza for grilling greatness!
  • 1 package quick pizza dough (or home made/frozen dough)
  • 1/4 - 1/2 cup prepared pesto
  • 1 can medium artichoke hearts (or asparagus) - rinsed*
  • 1 small bottle roasted red peppers - rinsed*
  • 1 chicken breast (boneless, cooked, diced)
  • 1/4 cup onion - diced
  • 1-2 TBS olive oil
  • 1 1/2 cups cheese (shredded)
  • salt/pepper to taste
Yes, our grill is very 'seasoned' :)

Directions:

Preheat gas grill to medium heat.

Saute boneless chicken, onions in olive oil.
Cool and dice chicken into bite-size pieces.
Prepare crust according to directions.
Press into a disposable pizza pan (if grilling, the bottom will get sooty).
Spread pesto on dough.
Sprinkle diced chicken evenly.
Rinse, pat dry, and slice 2 or 3 artichoke hearts and place evenly around pizza.
Rinse, pat dry, 2 or 3 roasted red peppers and place evenly around pizza.
Sprinkle cheese
Salt & Pepper

Place on center rack of grill.
Cook for 15 minutes and check (all grills heat differently). I cooked our pizza 30 minutes on medium until the cheese was melted and the crust started turning brown.
 
Rotate 1/3 turn once every 10 minutes if your grill heat is uneven.
ENJOY!

* Rinse canned artichoke hearts, asparagus, and roasted red peppers, or the pizza gets to be too salty tasting.


Spare Tumblers and PVC

Q: What do you get when you have spare plastic tumblers and PVC connectors?
A: A great place to put your hair dryer and flat irons!

Large plastic tumbler (left) PVC connector (right)
Pre-drill and attach to inside cabinet door with wood screws.

Perfect fit with a convenient place for the cord.

Mini flat iron also fits nicely inside large tumblers.
Easy to organize inside cabinet or a great place to cool
without the cord laying all over the counter.

Monday, October 22, 2012

"Quick Organization"

"Quick Organization" might sound like an oxy-moron, but sometimes this method of organization tides us over until we find a better solution.

The Good:
We recycle plastic shopping bags and use them in our small garbage cans, mainly in the bathrooms.

The Bad:
Storing them... we crammed multiple bags into one bag and put them under the sink.

The Ugly:
This ended up being a bulky object crammed under the sink. Hard to move around. Hard to find anything that was under it.

QUICK ORGANIZATION SOLUTION 

Use an empty tissue box and smush the bags inside. It stacks easily inside the cabinet. When it is full, recycle the remaining bags -- back to the store.

Saturday, September 1, 2012

The Best Cinnamon Bars

From scratch... the ol' fashion way. Don't get scared off quite yet. You will be surprised at how quickly you can make these.... and you won't be able to wait until they are cooled to try one.. or two... or three...

The Best Cinnamon Bars
(Pan size shown: 13x18 Jelly Roll)
Ingredients & Directions

Preheat oven to 350 degrees.

Mix together until smooth:
  • 3/4 cup butter (softened)
  • 1 1/2 cup sugar
Add and mix until smooth:
  • 3 eggs
  • 1 1/2 cup flour
  • 3/4 tsp cinnamon
  • 1/2 tsp salt*
Grease a 9x13" pan.
Dump batter in pan and spread out evenly. Batter will be thick.
Bake on center rack in oven 20 minutes (or until a toothpick inserted in the center comes out clean).
Remove from oven and let cool.

JELLY ROLL PAN SIZE (13x18"):
Double the recipe for a jelly roll size pan but *use 3/4 tsp of salt (not 1 tsp). Makes 48 bars.

Serving options. Cinnamon Bars are prefect for morning coffee or to serve as dessert.
  • Cut and serve as is.
  • Dust with cinnamon & sugar.
  • Cut and use glaze or icing (recipe below) and drizzle on each bar or across entire pan.
  • Add 1/2 tsp - 1 tsp dollop of apple butter
  • In a bowl with ice cream
Icing Ingredients & Directions

Recipe to make swirls or decoration on each bar (as shown in photo above).

Mix together until smooth:
  • 1 cup powdered sugar
  • 1 Tbsp cream (or half&half)
  • 1 1/2 tsp vanilla
To decorate bars, use a snack size zip baggie.
Add packing tape to corner to reinforce.


Fold over and trim excess tape.
 
 
Fill with icing, seal the zip closure, and snip the corner.


Squish icing through hole in the baggie and make decorative designs, swirls, squiggles, etc on bars. Dust with cinnamon to finish, or leave as is.
 
If making the same design on each bar, cut them first.


ENJOY!!!


Thursday, May 31, 2012

Doing something for someone who can never repay you

John Wooden once said, "You can't live a perfect day without doing something for someone who will never be able to repay you."


That is something to think on.... and act on.

Have you ever had someone do something for you just because? Maybe they helped you do yard work, sent a card, a small gift.... It leaves a lasting impact, a memory, a feeling of gratitude we can never forget. It makes us feel special when someone shows us how much they care.

Now what if someone you DIDN'T know did something for you because they wanted to brighten your day?

As my mom relaxes for the evening, she enjoys making necklaces for children she has never met. She gives them to me to deliver on missions trips to children who are living in poverty all over the world. Although my mom loves making the necklaces, I think I get to enjoy the best part.... seeing the smiles on all those little faces and receiving the hugs and kisses. It is amazing how a simple, thoughtful gift can brighten the days of a child and those around them.

If you would like to do something like this, be prepared... The joy you receive out of doing something for someone else will be beyond your imagination.

Simply gather the supplies needed below, use your creativity and make bracelets or necklaces or bookmarks..... then contact a local church and let them know you would like to give these gifts to community, national, or international outreach. You may even want to be sure to be there when they are shared with others!!

Supplies needed:
  • Elastic cording
  • Pony Beads (or other plastic or wooden beads)
  • Scissors
Directions (for bracelets):
  • Cut a 7" piece of cording
  • Tie 1 bead to the end (single knot) about an inch from the end (this helps beads stay on cord)
  • String beads about an inch away from the opposite end
  • Untie the bead and tie the ends of the cord together (triple knot)
  • Trim loose ends
Below is photo of bracelets made during a recent family get-together. While I visited my niece, nephew and friend, we put together bracelets for children as we chit chatted and got caught up on what was going on in our lives. We had SO much fun laughing and enjoying each other's creativity!
Bracelets made with "'Pony Beads" and other plastic beads
Enjoy your time making these fun gifts... and know you are making a difference in the lives of others.

Wednesday, May 30, 2012

DIY Family Tree Home Decor

Create Your Own Family Tree on a Budget

Family... one of God's masterpieces.
Family means the world to us and I have always wanted to create a Family Tree somewhere in our house. After many years of imagining what this might look like, I started the search for vinyl trees hoping the ideas would percolate. I found one, except I wasn't willing to pay the price ($280+) for a vinyl tree that wasn't 'exactly' what I wanted. So, the creative hat went on. The result is what I am sharing here.... the DIY method of creating an original Family Tree that will work wonderfully for your family and add a splash of your own creativity on a wall that can be enjoyed by all who visit.

Less Is More. It is amazing what you can create if you plan, budget, and have a little patience. When you are brewing an idea for a project, keep your eyes open for clearance items, sale items, and plan ahead to get your supplies when they go on sale. Yes, sometimes you need to wait. But it is quite worth it when you see your savings.

STEP 1. Find a tree
  • Find a photo or image of a tree shape you like. (I liked the 'blowing in the wind' style.)
  • Study it, practice drawing it on a blank piece of paper. 
STEP 2.  Color decisions
  • Decide on a color you would like your tree to be
  • Decide on a color for the extras (leaves/blossoms)
    (I went with an antique dark brown and used leftover 'Merlot' paint from our kitchen for 'leaves' to tie our rooms together) 
STEP 3. Gather your supplies.
  • "Sample-size" paint (you can buy this at Menards/Home Depot/Lowes for $3-$4) - This is the perfect size!
  • Foam brushes: Two 1", one 2" (Use foam brushes instead of bristle brushes. You get a much sharper edge.)
  • Foam stamps (leaf / blossom) - these are actually hard to find right now (must be a 1990 trendy thing). I had some from back in the day.
  • Painter's tape (to hang a picture of your tree you are going to paint and any other additions you will need to paint around - for example a vinyl 'saying' about Family, etc.
  • Frames
  • Hot glue gun
  • Ribbon
  • Scissors
STEP 4. Visualize the tree on the wall.
  • "Test paint" with a damp foam brush (just dip it in a little water and blot off) or use a pencil to lightly draw the stick shape (no need to be elaborate and draw the wide base, etc. You can fill this in as you paint.) *TIP, using an eraser on the wall will cause shiny lines to appear in the paint. Best to paint over any pencil left over.
STEP 5.  Paint
  • I know what you are thinking. "I am not artsy!" Well, I discovered you can't really mess up a tree. Branches crisscross, have angles, are rounded, pointed, square, broken off.
  • If you mess up, use original leftover base paint from the wall to paint over what you don't like.

"Sketch" with your foam paint brush.


It is coming together, but.... we don't like the top center of the tree where it splits.
It's weird looking. Time to get out the base color of the wall for some touch-up.


Tree has been touched up. Vinyl lettering applied. Now, for some leaves blowing off.


I used foam stamps from years ago. You could also purchase craft foam
and make your own shapes (blossoms or leaves)

STEP 6. Frames and Photos (remember, the goal is 'not spending much')
  • I went to the dollar store (the one where everything is actually $1) and picked up a bunch of random, dark colored 5x7 frames.
  • I found ribbon I liked in a clearance bin at a craft store a few weeks before.
  • Had photos printed at an inexpensive photo center
STEP 7. Apply the ribbon to the frames
  • Cut ribbon to the length you wish
  • Remove 'stand-up' things from the backs of each frame so they lay flat on the wall.
  • If using multiple colors/styles of ribbon, lay them out on the frames (if using different style frames)

Frames laid out with ribbon ready to be applied.

  • Apply hot glue to the back - top corners of the frame.
  • Apply the ribbon at an angle.
  • While the glue is still hot, place a pencil or point of the scissor (as shown below) at the top of the ribbon (where it will hang from the wall) and gently pull the slack out of the ribbon.
    This will allow you to adjust the ribbon, while the glue is hot, to the angle it will naturally hang on the wall and will prevent any wrinkles.
  • Trim excess ribbon from the frame edges. 

Apply hot glue to the back - top corners - of the frame and 'hang' it on a flat surface
before the glue dries to avoid wrinkles in the ribbon when hanging.


The 'almost' finished Family Tree (still a few photos to hang)


STEP 8. Update the couch. 1990 called, they want their patch-work style back.  (Less is more. The couch will have to wait.)

THE ICING ON THE CAKE.... THE SAVINGS: 
Orignal cost would have been $295 for the vinyl tree alone (plus shipping & handling).
Entire DIY Family Tree shown here: $40.

Project Time estimate (doesn't include shopping):
  • Painting the tree: 4 hours
  • Applying Leaves: 15 minutes
  • Applying Vinyl Letters: 20 minutes
  • Creating Frames (cleaning/ribbon/inserting photos): 1 hour
  • Hanging Frames: 45 mintes (deciding where they go took the longest)
    TIP: Use pins vs nails. Less noticible when you need to move a frame.