Create Your Own Family Tree on a Budget
 |
| Family... one of God's masterpieces. |
- Find a photo or image of a tree shape you like. (I liked the 'blowing in the wind' style.)
- Study it, practice drawing it on a blank piece of paper.
- Decide on a color you would like your tree to be
- Decide on a color for the extras (leaves/blossoms)(I went with an antique dark brown and used leftover 'Merlot' paint from our kitchen for 'leaves' to tie our rooms together)
- "Sample-size" paint (you can buy this at Menards/Home Depot/Lowes for $3-$4) - This is the perfect size!
- Foam brushes: Two 1", one 2" (Use foam brushes instead of bristle brushes. You get a much sharper edge.)
- Foam stamps (leaf / blossom) - these are actually hard to find right now (must be a 1990 trendy thing). I had some from back in the day.
- Painter's tape (to hang a picture of your tree you are going to paint and any other additions you will need to paint around - for example a vinyl 'saying' about Family, etc.
- Frames
- Hot glue gun
- Ribbon
- Scissors
- "Test paint" with a damp foam brush (just dip it in a little water and blot off) or use a pencil to lightly draw the stick shape (no need to be elaborate and draw the wide base, etc. You can fill this in as you paint.) *TIP, using an eraser on the wall will cause shiny lines to appear in the paint. Best to paint over any pencil left over.
- I know what you are thinking. "I am not artsy!" Well, I discovered you can't really mess up a tree. Branches crisscross, have angles, are rounded, pointed, square, broken off.
- If you mess up, use original leftover base paint from the wall to paint over what you don't like.
 |
| "Sketch" with your foam paint brush. |
 |
| It is coming together, but.... we don't like the top center of the tree where it splits. It's weird looking. Time to get out the base color of the wall for some touch-up. |
 |
| Tree has been touched up. Vinyl lettering applied. Now, for some leaves blowing off. |
 |
| I used foam stamps from years ago. You could also purchase craft foam and make your own shapes (blossoms or leaves) |
STEP 6. Frames and Photos (remember, the goal is 'not spending much')- I went to the dollar store (the one where everything is actually $1) and picked up a bunch of random, dark colored 5x7 frames.
- I found ribbon I liked in a clearance bin at a craft store a few weeks before.
- Had photos printed at an inexpensive photo center
- Cut ribbon to the length you wish
- Remove 'stand-up' things from the backs of each frame so they lay flat on the wall.
- If using multiple colors/styles of ribbon, lay them out on the frames (if using different style frames)
 |
| Frames laid out with ribbon ready to be applied. |
- Apply hot glue to the back - top corners of the frame.
- Apply the ribbon at an angle.
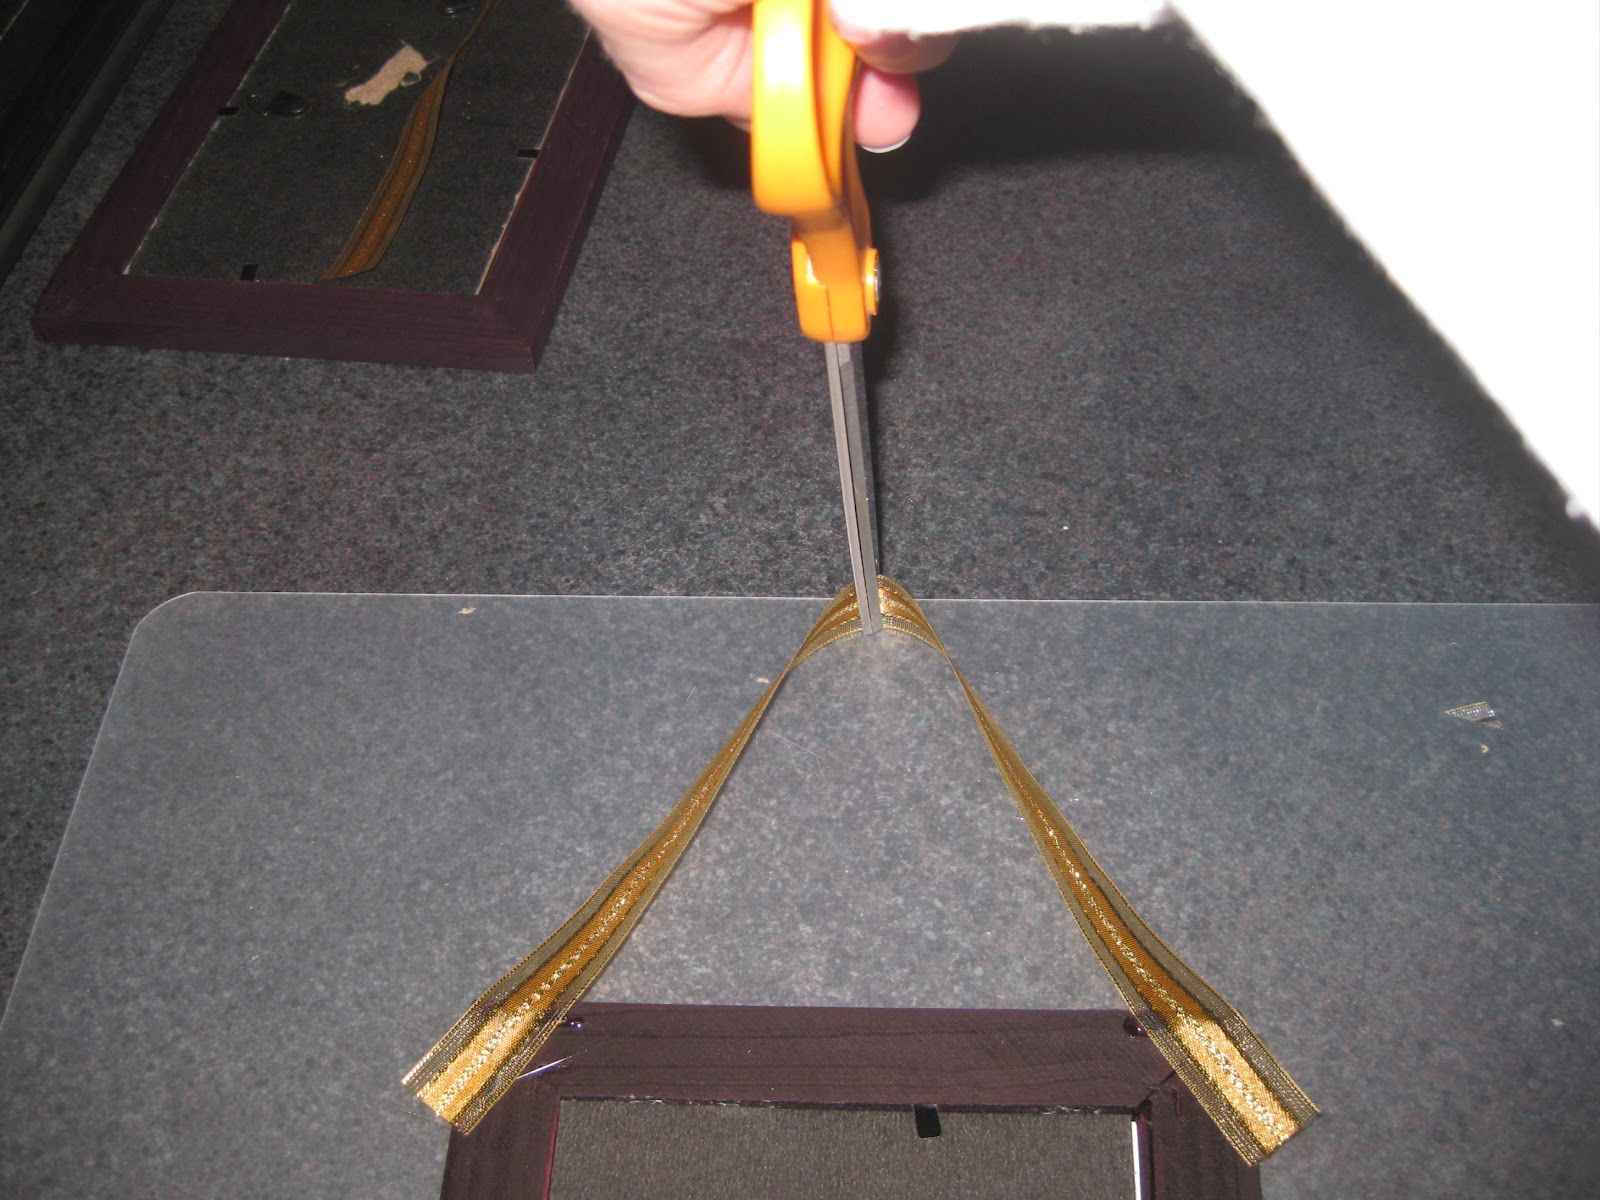
- While the glue is still hot, place a pencil or point of the scissor (as shown below) at the top of the ribbon (where it will hang from the wall) and gently pull the slack out of the ribbon.This will allow you to adjust the ribbon, while the glue is hot, to the angle it will naturally hang on the wall and will prevent any wrinkles.
- Trim excess ribbon from the frame edges.
 |
| Apply hot glue to the back - top corners - of the frame and 'hang' it on a flat surface before the glue dries to avoid wrinkles in the ribbon when hanging. |
 |
| The 'almost' finished Family Tree (still a few photos to hang) |
STEP 8. Update the couch. 1990 called, they want their patch-work style back. (Less is more. The couch will have to wait.)
THE ICING ON THE CAKE.... THE SAVINGS:
Orignal cost would have been $295 for the vinyl tree alone (plus shipping & handling).
Entire DIY Family Tree shown here: $40.
Project Time estimate (doesn't include shopping):
- Painting the tree: 4 hours
- Applying Leaves: 15 minutes
- Applying Vinyl Letters: 20 minutes
- Creating Frames (cleaning/ribbon/inserting photos): 1 hour
- Hanging Frames: 45 mintes (deciding where they go took the longest)TIP: Use pins vs nails. Less noticible when you need to move a frame.
Just curious how you ended up painting the very top of the tree since it looks like it is on a wall beside stairs. I too want to add a family tree on the main wall in my living room which happens to be the wall beside the stairs & I don't exactly know how I'm going to be able to paint the top of tree and branches.
ReplyDeleteCheck into tool rental places for scaffolding you can use around stairs or those ladders that you can bend into different configurations for multiple different uses...one of them used to advertise for use on stairs. I hope this helps!! Happy painting!
ReplyDelete